Business Management
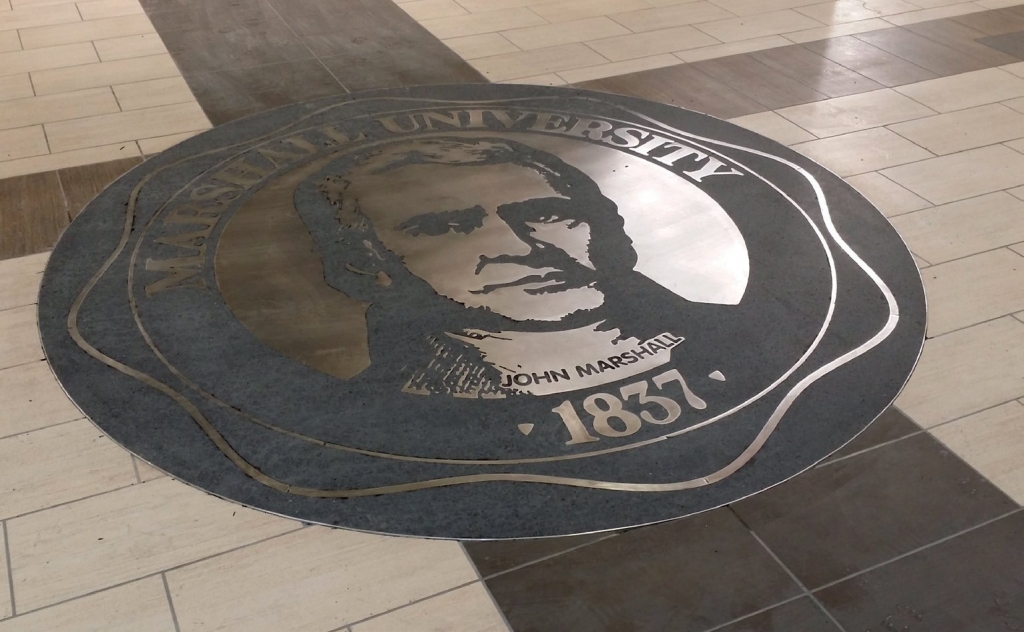
Paris Signs Creates Stately Floor Graphic for Marshall Univ.
Fabricated-metal inlay required creative installation solution
Published
9 years agoon
Tony Wheeler is president of Paris Signs (Huntington, WV).
Before starting a unique project, we brainstorm possible problems and solutions. Usually, every project is at least somewhat similar to something we’ve done in the past. In this case, a floor-inlaid graphic for the Marshall Univ. campus, we’d built and installed a brass version of this same logo. For that job, we’d set the brass graphic into concrete, and the brass comprised the logo’s dark area.
In this case, the metal component represented the graphic’s light area, so the customer wanted brightly colored metal. We suggested stainless steel, a durable material that would endure the concrete and the epoxy grout being used as the fill material around the stainless. After further study, we chose 404 stainless-steel alloy because of its machinability and availability.
Creating a floor graphic of inlaid materials is familiar work for us. We’ve inlaid brass into vinyl tile, vinyl tile into vinyl tile, and brass into concrete. But, making a floor-graphic inlay with stainless steel posed a few new problems. First, can you cut stainless steel with precision the way you would cut vinyl graphics on a plotter, or PVC on a CNC router?
We’ve worked with stainless steel, so we’re familiar with it. But, we’d never tried to cut graphics from it. First, we tested our MultiCam 3000 CNC router to see if we could cut the material. Our test proved that we could machine it, but stainless presented some issues. It cut very slowly, and the ensuing chips were small and razor-sharp. We decided this wouldn’t be an efficient way to produce our inlay. We had to find a better solution.
Fortunately, we could call upon Marshall Univ.’s Advanced Manufacturing Institute right here in Huntington. We could rent time on their AMADA Lasmac CNC laser cutter. We cut the parts very accurately with the laser. We processed the steel at a rate of 73 in. per minute, and the kerf, or width of the cut, measured less than .007 in.
AdvertisementBest practices
When inlaying stainless steel into floors, consider a few potential issues. Most importantly, how would the stainless steel be secured after the floor-fill material was poured around it? When stainless steel is cut with a laser, the edges are smooth and square with a polished finish. Epoxy grout doesn’t stick well to stainless steel, so we decided to make our inlay into a laminate with two, 3/16-in.-deep, stainless-steel layers. The bottom layer creates a “foot” around the edge of the graphic, which gives the fill material something to flow over, and a mechanical bond that holds to the concrete. I was concerned the stainless would simply lift out of the epoxy grout if there was no lip to hold it. This also gave us the ability to add bridges between the small pieces, which links them together below the grout fill material. Otherwise, properly aligning and securing all the small pieces would be difficult.
We tested Lord Adhesives’ 406/19 acrylic adhesive for bonding the two laminated layers together. We have used it to bond aluminum for years. The material must be absolutely clean, with a surface rough enough to bond with the adhesive. Our test showed a strong bond to the stainless steel using the Lord product. Also, both laminate pieces must be fabricated to the same thickness. This prevents warping and ensures the “foot” is no bigger than the laminate layer’s thickness. Therefore, the fill material won’t crack around the edges.
In addition to the foot, we installed mounting studs through the bottom layer using simple, bugle-head, stainless-steel screws. We trapped the screwheads between the laminate layers in countersunk holes. We cut all the holes on the CNC laser cutter to create an installation pattern.
When cutting the material, make sure the substrate’s crown side is up. This way, the material won’t spring up and hit the cutter, and the edges don’t curl up while you’re installing the material. After we’d cut the stainless, its crown stopped us from laying the material flat. So, we used our slip roll to lightly spring the material in the opposite direction until it would lay flat.
Surface material
Because this represented our first time working with stainless steel as an inlay, we forgot to check the material’s surface for imperfections.
After the parts were cut, we discovered small nicks and rolling marks that required lots of repair time. Stainless steel isn’t easily sanded to a smooth surface. Repairs required a TIG welder, and then we ground the surface flat. The rolling marks wouldn’t have created an obstacle if we would’ve seen them before we began cutting the material. We would have simply cut all the parts in the same direction so the pattern would be consistent.
Pre-cut material requires thorough sanding. Finding sandpaper that would effectively grind the surface, without creating rounded corners, was a challenge. Finally, using a random-orbit sander, we settled on 80-grit aluminum oxide as an abrasive, and finished with 180-grit sandpaper. We completed all the sanding and surface repair prior to laminating. It’s important, because overheating the glue post-lamination could compromise its strength.
Lamination
When laminating layers of metal – or any other material, for that matter – the materials must be kept flat when they’re glued together. If not, it will be impossible to pull them flat when installing. To hold the laminated materials flat when gluing, we used our CNC router’s vacuum-holddown table.
Our MultiCam features a Turbovac 40-hp, high-pressure, low-volume vacuum. The Turbovac very effectively pulled the two layers flat while the glue set. In order to seal around the layers while gluing, we covered them with a layer of plastic sheeting, which sealed the edges so the vacuum could suck all the air out during lamination. We simply clamped some of the smaller pieces together. It only required approximately 15 minutes for the acrylic adhesive to set completely; we were pleased the process proved to be so rapid.
Installation
With most projects we build, we factor the installation process, and the requisite equipment, into the initial plans. Because we built the inlay as a laminate with mounting studs, and CNC-cut all parts, installation was straightforward. We simply applied the pattern to the floor, and spraypainted the registration marks onto the concrete.
We drilled the mounting holes directly through the PVC pattern, and epoxied all of the parts into place using Red Head Epcon C6+ anchoring epoxy. We keep 1 x 2 x 16-in., stainless-steel bars in our shop to weigh down glued components, and we used the bars to hold all laminated pieces while the epoxy set.
We prefer to maintain control over all of our projects from start to finish. This allows us to test all materials ourselves prior to starting jobs, and potential problems and solutions can be worked through prior to ordering material. However, we focus on what we do best, and maintain relationships with contractors who can handle the rest. As such, for most floor-graphic installation, we partner with a floor-material vendor or concrete finisher.
We’d built a similar project a few years ago. Controlling the fill material so it created a suitable surface between graphic layers had been challenging, and it created an issue this time as well. Finding a suitable fill material is difficult. Epoxy fill materials exist, but they’re very soft once they’re cured, and they scratch easily. Always test your fill material on a test board that is the same depth as the actual fill areas and with the same inlay materials.
The original epoxy grout material proved unsatisfactory to both us and the architect. Therefore, the project was left incomplete for a few weeks while the architect looked for a suitable fill material.
AdvertisementThe customer elected to have terrazzo poured flooring to fill in the black-graphic areas. Terrazzo is made of stone and colored-epoxy resin. In this case, the chips were black marble set into black, epoxy resin. The flooring company applied the material into the fill areas, and once it set, a contractor who specializes in terrazzo-flooring applications ground the surface flat with a diamond-cut wet-grinder. Because the stainless steel was so tough, the grinders could work right over top of it without damage, and it gave the stainless a smooth, consistent finish.
We learned a valuable lesson from this project – make sure all material surfaces are free of scratches or roll marks prior to cutting, and determine the fill material before you start. I also wish the terrazzo chips were smaller – ideally, as small as sand granules. Overall, however, I think the customer has a beautiful, durable entry graphic for its new building.
Equipment and Materials
Adhesive: Acrylic 406/19 adhesive, from Lord Adhesives (Cary, NC), (877) 275-5673 or www.lord.com; Red Head Epcon C6 high-strength, concrete adhesive, from ITW Redhead (Elgin, IL), (630) 825-7900 or www.itwredhead.com
Cutter: CNC laser cutter, from Amada America Inc. (La Brea, CA), (714) 739-2111 or www.amada.com
Router: MultiCam 3000 CNC router and TurboVac vacuum-holddown system, from MultiCam USA (DFW Airport, TX), (972) 929-4070 or www.multicam.com
Sander: Random-orbit sander, from such vendors as Milwaukee Tool Co. (Brookfield, WI), (800) 729-3878 or www.milwaukeetool.com
Substrate: Alloy 404 stainless-steel, from industrial-equipment and metal-supply shops
Welder: TIG welder, from such vendors as Miller Electric Mfg. Co. (Appleton, WI), (920) 734-9821 or www.millerwelds.com
More about Tony and Paris Signs
Founded in 1991, Paris Signs (Huntington, WV) provides full-service signshop capabilities, which include dynamic-digital signs, channel letters, monument signs and vehicle wraps, among other sign types. The company operates a 14,000-sq.-ft. manufacturing facility, and employs approximately 20 design, fabrication and installation employees. Its client list includes regional and national hospitals, universities and retailers.
Wheeler said. “Our business model now and moving forward is based on quality and innovation. Today’s customer expects faster and higher quality than ever before. We have invested in the best equipment and facility for efficiency”.
Wheeler also operates www.signmonkey.com, a website that offers wholesale, UL-listed channel letters to the sign industry. He recently received a U.S. patent for a Plug-and-Play power-delivery system for LED, channel-letter installation that’s UL listed and doesn’t require an electrician’s license to install.
For more information, visit www.parissigns.com or www.signmonkey.com
SPONSORED VIDEO
Introducing the Sign Industry Podcast
The Sign Industry Podcast is a platform for every sign person out there — from the old-timers who bent neon and hand-lettered boats to those venturing into new technologies — we want to get their stories out for everyone to hear. Come join us and listen to stories, learn tricks or techniques, and get insights of what’s to come. We are the world’s second oldest profession. The folks who started the world’s oldest profession needed a sign.
You may like


Advertisement
Subscribe

Magazine
Get the most important news
and business ideas from Signsofthetimes Magazine.
Advertisement
Most Popular
-

 Tip Sheet1 week ago
Always Brand Yourself and Wear Fewer Hats — Two of April’s Sign Tips
-

 Photo Gallery3 days ago
30 Snapshots of the 2024 ISA Sign Expo
-

 Ask Signs of the Times5 days ago
Why Are Signs from Canva so Overloaded and Similar?
-

 Real Deal2 weeks ago
A Woman Sign Company Owner Confronts a Sexist Wholesaler
-

 Benchmarks1 week ago
6 Sports Venue Signs Deserving a Standing Ovation
-

 Photo Gallery4 hours ago
21 Larry Albright Plasma Globes, Crackle Tubes and More
-

 Women in Signs2 weeks ago
2024 Women in Signs: Megan Bradley
-

 Women in Signs1 week ago
2024 Women in Signs: Ashley Borell