With deepest apologies to Joyce Kilmore and God, it is possible to sculpt a high-relief, dimensional, appliqué. Replicating trees with this method is the highest form of flattery; read on to learn this technique, which can beautify any sign panel.
Making a template
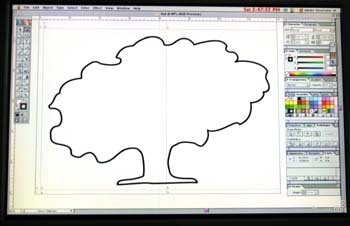
First, I needed a good tree rendering; a dramatic silhouette is preferable to a conventional, symmetric shape. A Google.com search yielded more than 250,000 images. Fortunately, I found an attractive oak-tree drawing within the first 500 listings. I printed, scanned and outlined the image using Adobe Illustrator® on my Mac® G4 computer.
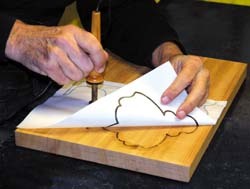
Then, I printed the outlined tree onto high-quality tracing paper using my HP LaserJet 2200d printer. Because laser printers deposit carbon particles onto a substrate to reproduce images on paper, it’s possible to transfer the artwork to a piece of mahogany or HDU by applying heat from a heat-transfer pen or household iron.
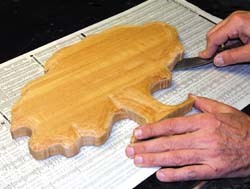
Next, I cut out the silhouette using a scroll saw with a spiral blade. A saber saw can accomplish the task, but a spiral blade moves the panel in any direction while cutting. This is especially helpful when navigating many small arcs and curves.
Carving time
Advertisement
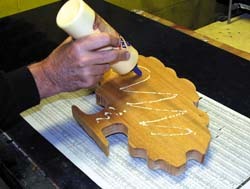
After I cut out the silhouette, I was ready to carve around the edges and trunk. I secured the cutout to the workbench by first covering the tabletop with newspaper, using a few zigzag beads of yellow carpenter’s glue. Next, I applied glue to the cutout’s back, and I pressed the silhouette onto the newspaper.
This technique provides excellent adhesion with minimal glue. Alternately, the cutout could be attached to a piece of wood as a base and secured to the bench’s top with a clamp. The latter approach would facilitate orienting the cutout in any direction desired. Removing the cutout is quick and easy with a flexible, metal, paint scraper.
The only required chisel carving is on the trunk and edges. To detail the tree trunk, I made a pencil sketch of an actual tree and placed it upon the silhouette to serve as a guide. Next, I tapered the tree’s entire edge and sloped it approximately 60°.
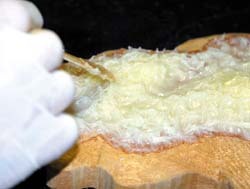
To give the tree the illusion of full-bodied girth, without carving away any material, I added material by "sculpting" with a two-part epoxy; this comprises an epoxy resin and a hardener. Having mixed both parts, I liberally applied a generous amount of colloidal silica powder until I’d created a paste that’s roughly the consistency of peanut butter. Without silica, the epoxy’s texture would be syrupy; thus, it becomes much more workable.
With a tongue depressor, I began sculpting. As the epoxy built up on the silhouette, I twisted my applicator to provide the desired effect of leaf detail. A careful study beforehand of actual trees helped produce a realistic effect, such as the crests and valleys in an actual tree’s surface structure.
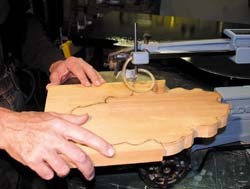
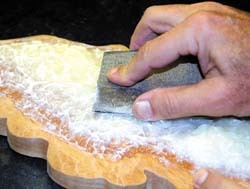
Once I’d reached my desired high-relief texture on the silhouette, I cured the epoxy paste overnight. After the epoxy hardened, I removed the sharp points and edges I’d created during the sculpting phase. Then, I sanded it by hand; aggressive, 60- or 80-grit sandpaper does the job well. I followed with 120-grit to smooth its texture.
Advertisement
Beautification
The newly sculpted tree is now ready for size and gilding. At this point, I could’ve molded and cast the sculptured tree and produced multiple copies to be used in future applications (see ST, May 2003, page 40). If you do so, begin the moldmaking process after the following coating procedure.
Polyurethane-resin castings (created using the procedure in my May column) don’t require primer when you use Krylon® Fusion spraypaint; the paint fuses with the plastic casting.
However, for wood originals, I apply three coats of Krylon® automotive primer before applying several coats of black paint. I chose black because the vertical edge on the finished tree will provide an attractive, emphatic border. Not gilding the sides also simplified sizing and gilding procedures, and permitted easy handling during installation onto the panel. To avoid goldleaf inadvertently sticking to the black sides, I dusted the periphery with gilder’s rouge — talcum powder also works.
Before sizing and gilding, Lestingi applied Krylon® Fusion spraypaint.
Advertisement
Prior to gilding, he applied three coats of Krylon automotive primer prior to several coats of black paint, which provides an emphatic border to the tree’s edge.
Using a gilder’s tip, Lestingi applied 23k looseleaf, double gold.
I sized the sculpture using LeFranc’s slow size with a bit of 1Shot® chrome-yellow lettering enamel, which I added as a color indicator. The longer the size cures, the greater the gild’s brilliance; the size may cure in 12 to 48 hours.
Because genuine, 23k gold is only 0.0001 in. thick, it can’t be handled using your finger. The traditional goldleaf applicator is the gilder’s tip brush. First, I "charged" the brush with oil (not static electricity, as some mistakenly believe), which allowed gold to attach to the oil on the brush (I used ChapStick™ lip balm). Simply rubbing it on my hand made it easy to use.
Voilá! Having used a white-sable brush to create the impression of leaves, Lestingi finished his creation. Against a backdrop of God’s creation, judge for yourself the authenticity of Lestingi’s work.
I lightly swiped the gilder’s tip into the balm across my hand; the tip easily lifted the leaves away from their sheets. Goldleaf attached to the sculpture, because the size’s tack is greater than the oil on the brush.
After I covered the tree with gold, I looked for any missing spots, or holidays. I filled these with small pieces of leaf, which I transferred from the leaf booklet to the tree by using a 1/2-in., white-sable brush. Placing a piece of cardboard under the leaf helps make it rigid and easier to lift from the page; I easily dislodged my desired amount of gold and placed it on the sculpture. Finally, I used the white-sable brush to detail myriad pieces that represent the tree’s multitude of leaves.
I attached it to the sign by twisting three studs into the appliqué’s back and inserting them inside silicone-filled holes that drilled into the signface.
This practically foolproof tree appliqué is now ready to adorn a sign, and confers an aura of dignity and elegance.


 Tip Sheet1 week ago
 Ask Signs of the Times2 days ago
 Real Deal1 week ago
 Benchmarks5 days ago
 Editor's Note2 weeks ago
 Women in Signs1 week ago
 Product Buying + Technology2 weeks ago
 Photo Gallery7 days ago