My restoration work for the American Sign Museum has provided ample evidence of the toll time takes on electric signs. During the past several months, I’ve encountered virtually every malfunction faced by service mechanics. Adding to the challenge, many antique signs suffer the cumulative effects of decades of improper and stopgap repairs. Thus, I’ve revisited some electric-sign basics while learning some new lessons from pre-1960s technology.
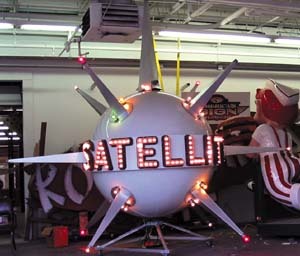
Many signs built prior to 1940 incorporate incandescent bulbs, instead of fluorescent lamps. Even today, however, some retro designs incorporate various screw-base lightbulbs. As I discovered when repairing a globe-style sign that uses 10-watt bulbs to illuminate open-channel letters (Fig. 1), the maintenance of correct polarity throughout the bulb circuits is critical.
Sign mechanics might assume reversing the hot wire (black or red) and the neutral wire (white) makes no difference. They may assume this because many household-lamp plugs may be inverted in wall receptacles without affecting operation. But when bulb bases protrude through metal backings, as they do in certain signs, the hot line must be connected to the sockets’ center contacts. The hot line carries the majority of the circuit’s voltage. Connecting it to the threaded socket shells causes electrical shorting between the bulb bases and the metal backing.
If a bulb-type sign trips the circuit breaker, reverse the primary wires and retest. If the sign still trips the breaker, check all wiring and socket connections to determine whether polarity might be reversed at any other points in the circuit. If your company builds bulb-type signs like this, ensure that your fabricators understand the importance of correct polarity.
Neon’s lost traditions
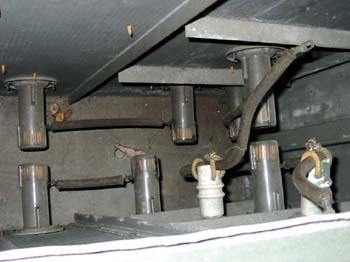
When neon was still a novelty during the 1920s and ’30s, sign builders appreciated high-voltage systems’ special requirements. Many vintage neon signs incorporate large-diameter, rubber- and fabric-sheathed, secondary cables, which are carefully routed, via porcelain insulators and bushings, to effectively isolate them from metal surfaces and adjacent cables (Fig. 2). Such careful construction has kept some of the collection’s oldest neon signs virtually weatherproof after more than 70 years.
Another neglected practice in cabinet-type neon signs — marking transformers according to the tubing circuit they operate — simplifies troubleshooting. Write this information in permanent ink on the exposed side of each transformer.
Rusted attaching bolts complicate removing old transformers from neon signs. In many cases, corroded bolts must be removed with a hammer and chisel. But I’ve found that several antique neon signs incorporate brass bolts, which are easy to remove despite decades of weather exposure. Stainless-steel bolts may also be used for this purpose.
For electrode connections, PK housings have supplanted spring clips, which clamp electrode wires firmly to create reliable and durable electrical connections. Old neon signs, or ones that have endured improper service, particularly suffer from poor electrode connections, which can cause buzzing and sizzling noises and lead to more serious problems. Even with PK housings, however, dirty or broken contact springs cause poor connections. Also, when tubes are mounted with longer standoff dimensions, electrodes may not sufficiently penetrate the housings to maintain proper spring contact.
Most contemporary neon signs’ electrical systems can’t withstand long-term, outdoor use. Because corporate images change frequently today, a neon sign’s average lifespan is substantially less than during the early period of electric signs. But this doesn’t relieve sign builders of their obligations to create durable products that provide reliable service.
Why not? Because signmakers who build quality products that cost less to maintain build a stronger reputation than builders whose customers are constantly troubled by design-related service calls. Whether a sign operates five or 25 years, don’t neglect durability factors.
Fluorescent considerations
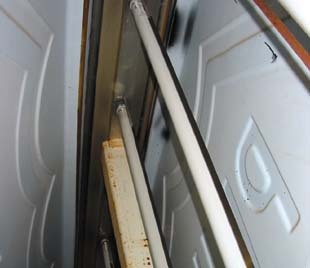
Internally illuminated fluorescent signs represent a major portion of the outdoor sign market. But, their longevity can be affected by certain design factors. For example, a waterproofed sign cabinet prevents chronic electrical failures. The most common moisture-related failures affect vertically lamped signs. If holes or gaps exist in the cabinet top, the lamps wick water downward into the lower sockets and raceways (Fig. 3). Furthermore, because vertically lamped signs typically incorporate ballasts vertically mounted on the sides of the cabinet frame, water may also wick down along ballast wires and into the ballast casing.
Horizontal lamp configurations (Fig. 4) preclude the wicking effect. When vertical lamps must be used, however, the sign cabinet must be seamless — or, at least, carefully sealed. Also, installers frequently fail to replace or tighten hoisting bolts, which create leaky sign cabinets. Therefore, design the cabinets so that bolts don’t need to be removed. When replacing hoisting eyebolts with standard, hex-head bolts, however, place rubber or neoprene washers between the bolt heads and steel washers to prevent leaks.
Condensation and cracks often develop in aging plastic sign faces and undermine moisture resistance. For this reason, a well-made, outdoor sign should incorporate drain holes in the bottom of the cabinet. But, these holes must be periodically cleared of accumulated debris for proper draining.
Besides preventing moisture, group relamping (replacing every lamp in a sign) probably has the greatest impact on reducing lighting failures. Fluorescent signs should be relamped at least every two years. When replacing lamps during routine repairs, therefore, replace every lamp on the same ballast circuit. Replacement of only one or two lamps in a particular sign can restore full illumination, but it costs your customer more money in the long run by increasing the frequency of service calls. A blown lamp degrades other lamps operated by the same ballast.
Unwarranted assumptions
When troubleshooting electric signs, don’t assume the failure cause before testing. For example, if a serviceperson replaces two fluorescent lamps, and the sign fails to illuminate, he may hastily conclude that the ballast must be defective. But a costly ballast replacement still doesn’t fix the problem. Further investigation reveals that the secondary wiring shorted inside a raceway, or perhaps a wire broke off from a wire nut.
Although obvious clues may indicate the problem’s source, hasty assumptions often lead you down the wrong path. As in our socket-polarity example, many baffling electric-sign problems have elementary causes. Thus, begin your diagnosis at the power source, and then proceed to the "downstream" components. In some cases, a simple voltage test may identify the problem and save hours of unnecessary trial and error.


 Tip Sheet1 week ago
 Photo Gallery2 days ago
 Ask Signs of the Times4 days ago
 Real Deal1 week ago
 Benchmarks7 days ago
 Women in Signs1 week ago
 Photo Gallery1 week ago
 Women in Signs1 week ago